Debugging tlatools with Intellij IDEA
- Clone tlaplus repo
- Open
tlatools/org.lamport.tlatoolsin Intellij IDEA - Follow DEVELOPING.md and build tla2tools.jar from the source (for consistency with local source)
- Right click
srcdirectory and mark it as main source root - Run TLCDebugger with
"-agentlib:jdwp=transport=dt_socket,server=y,address=*:5005,suspend=y"(you can change the port) java option and using built tla2tools.jar instead of officially published one - Create
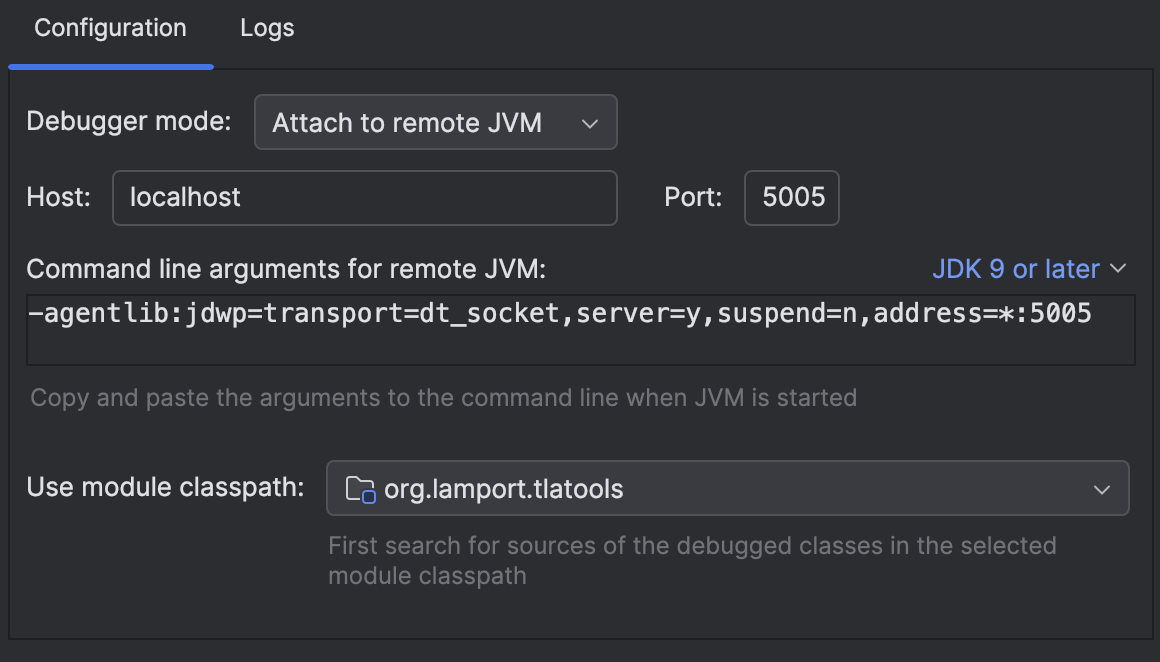
Remote JVM Debugconfiguration like below in intellij IDEA - Start Debugging the configuration above
Kafka compatible streaming solutions, July 2024
A curated list of streaming solutions that supports Apache Kafka protocol.
Solutions which just hosts Apache Kafka are not listed. (e.g. MSK)
| name | company | source code |
|---|---|---|
| WarpStream | WarpStream | N/A |
| Redpanda | Redpanda Data Inc. | https://github.com/redpanda-data/redpanda |
| StreamNative Ursa Engine | StreamNative | N/A (formerly https://github.com/streamnative/kop) |
| AutoMQ | AutoMQ | https://github.com/AutoMQ/automq |
| Confluent | Confluent, Inc. | N/A (some of them are available under https://github.com/confluentinc) |
| Tektite | N/A | https://github.com/spirit-labs/tektite |
| Upstash | Upstash, Inc. | N/A |
| Astradot | Astradot Inc | N/A |
End-to-end encryption in Apache Pulsar
Apache Pulsarはe2e暗号化をビルトインで備えている。
これは以下のように動作する。
- まず公開鍵ペアを事前に生成しておき、Producerに公開鍵、Consumerに秘密鍵を設定する。
- Producerはmessage暗号化用のsession key(共通鍵)を生成し、それを公開鍵で暗号化する。
- Producerはsession keyでmessageを暗号化すると同時に、message headerに暗号化されたsession keyを付与してBrokerに送信する。
- Consumerはmessage headerからsession keyを取り出し、秘密鍵で復号したのち、それを使ってmessageを復号する。
これにより、通信を盗聴する第三者やBrokerに対しmessageを秘匿できる。
ここで、以下のようなシナリオを考えてみる。
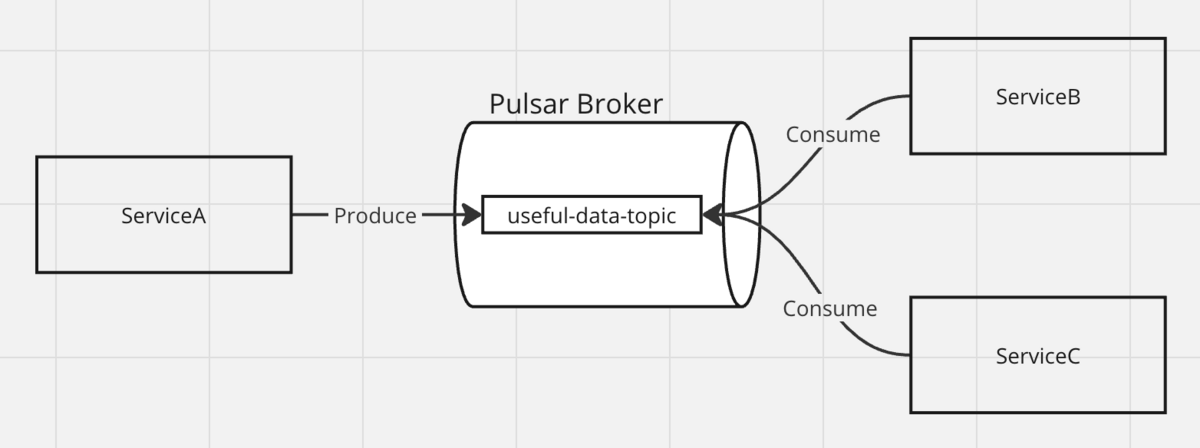
ServiceAがuserful-data-topicにデータを生成し、これをServiceB, Cがconsumeして利用している。 (Pulsarはmulti-tenantなプラットフォームであり、このようなユースケースはとても典型的だ。)
この場合、e2e暗号化のための鍵ペアをどう管理すればよいだろうか。 ServiceB, Cで秘密鍵を共有するのは多くの場合ガバナンス上の問題がある。
このようなケースに対応するため、Pulsar producerではsession keyを複数の公開鍵で暗号化し、すべてをheaderに含めることができるようになっている。 Consumer側では、自身の秘密鍵でいずれかのsession keyを復号し、それを使ってmessageを復号する。
ただし、Consumeするサービスが増えるごとにsession keyが追加されるため、それに応じてデータサイズが増えてしまう。
これに対しては、batch messagingを有効にすれば、各messageではなくbatchを対象として暗号化およびheaderを付与するため、データサイズの増加を抑えられる。
Experiment
データサイズ特性を実際に確かめてみよう。
% bin/pulsar standalone
% bin/pulsar-admin topics create persistent://public/default/test-topic
PulsarClient client = PulsarClient
        .builder()
        .serviceUrl("pulsar://localhost:6650")
        .build();

Producer<byte[]> producer =
        client.newProducer()
              .topic("test-topic")
              .enableBatching(false)
              .create();

Random random = new Random();
for (int i = 0; i < 10000; i++) {
    byte[] data = new byte[128];
    random.nextBytes(data);
    producer.sendAsync(data);
}

producer.close();
まずは、128 byteのmessageを10000件、batchingなし・暗号化なしで送信する。
% bin/pulsar-admin topics stats-internal persistent://public/default/test-topic | jq '.totalSize'
1679872
次に、batchingなしのままe2e暗号化を有効にして送信する。ここでは公開鍵を2つ設定する。
% for key in key1 key2; do
    openssl ecparam -name secp521r1 -genkey -param_enc explicit -out $key.pem
    openssl ec -in $key.pem -pubout -outform pem -out $key-pub.pem
done
Producer<byte[]> producer =
        client.newProducer()
              .topic("test-topic")
              .enableBatching(false)
              .defaultCryptoKeyReader(Map.of(
                      "key1", "file:///path/to/key1-pub.pem",
                      "key2", "file:///path/to/key2-pub.pem"
              ))
              .addEncryptionKey("key1")
              .addEncryptionKey("key2")
              .create();
% bin/pulsar-admin topics stats-internal persistent://public/default/test-topic | jq '.totalSize'
5919872
3.5倍のデータサイズとなった。messageあたり591 byteであり、message本文が128 byteであるため463 byteのオーバーヘッドが発生している。
次に、batchingを有効にして送信する。
% bin/pulsar-admin topics stats-internal persistent://public/default/test-topic | jq '.totalSize'
1380339
想定通り、サイズが抑えられることを確認できた。
Conclusion
Pulsarにおいて、複数サービスが同一topicをconsumeするケースのe2e暗号化の動作を確認した。
Tunneling Kafka protocol over HTTP
Apache Kafkaにおいて、client <-> server (broker)間の通信は独自のwire protocolで行う。
ここで、brokerとclientが別のネットワークにあってHTTPでの通信しか許可されていないシナリオを考える。
HTTP上で任意のTCP protocolをtunnelingするのは一般的なニーズであり、既存のソリューションも数多く存在する。
しかしながら、Kafka protocolのtunnelingは単純にはいかない。
これは、clientが接続する先のKafka brokerはMetadata requestによって動的にdiscoveryされるためだ。

動作としては以下のようになる:
- bootstrap-server (clientが最初に接続するbroker)をproxy serverに変えておく
- clientはbootstrap-serverにmetadata requestを送り、responseを受け取ってpartition leader等の接続先情報を得る
- clientは改めてdiscoverされたbrokerに接続しようとするが、これはfirewallでブロックされる
したがって、HTTP上でKafkaを使うには
- proxyをKafka-protocol-awareにして、Metadata responseを書き換える
- client側に手を入れて、Kafkaへの通信をハイジャックする(その上でHTTPでtunnelingする)
- (Kafka protocolを諦めて)HTTPでKafkaの機能を提供する
といった手段を取ることになる。
- Confluent REST proxyは3.の方法
- ただし当然Kafka clientをそのまま使えるわけではないため、既存のライブラリ・フレームワークなどは利用できない。
- kafka-proxyは1.の方法をとっている
- 次の仕組みで動作する:
- Kafka clientと同じネットワーク上にproxy serverを立ち上げる
- また、Kafka broker側ネットワークには(client側ネットワークのproxy serverからの)HTTP CONNECTを受けつけ、通信をtunnelingするサーバーを立ち上げる
- proxy serverは、metadata response内のbroker addressをlocalhost:{random port}に書き換え、かつそのrandom portをlistenするproxy serverを(必要に応じて)立ち上げる
- 次の仕組みで動作する:
HTTPでKafkaを使う場合kafka-proxyはよい候補だが、CONNECTは環境によっては許可されていない場合もあること、またtunnel serverの他にproxy serverをセットアップしなければならない点が面倒だ。
このことから、(Java限定ではあるが)新たなKafka tunnel over HTTP solutionを作ってみている。(現状ではまだPoCレベル)
ユニークな点として、本ライブラリは java.nio.channels.spi.SelectorProvider を差し替えてtunnelingを実現していることがある。(参考: NIOのSelectorの実装を切り替える)
- Kafka clientのnetwork I/OはJavaのNIO API (SocketChannel, Selector)を使って実装されている
- Network I/OをハイジャックしてHTTPにwrapするSocketChannel実装をSelectorProvider経由で差し込むことで、NIO APIを利用するKafka client側に手を加えずにtunnelingを実現している。

利用方法はREADMEを参照されたい。
KafkaStreams outer join semantics change in 3.1.0
Before 3.1.0, KafkaStream's stream-to-stream outer join used to produce a bit counterintuitive output.
When we have stream s1, s2 with 10 seconds window, s1.leftJoin(s2) produces below output before 3.1.0:
refs: kstream-kstream-join in 3.0.0
| t | s1 | s2 | leftJoin |
|---|---|---|---|
| 0 | {key:A,value:X} | {left:X,right:null} | |
| 5 | {key:A,value:Y} | {left:X,right:Y} |
Let's see this by example.
Against our intuition, though there's a matching record in right stream within 10 secs so the result would be only "joined" output, "unjoined" output also appears as soon as a record is produced to left-stream "eagerly".
From 3.1.0, the semantic is changed to only output second one in above example.
refs: kstream-kstream-join in 3.1.0
| t | s1 | s2 | leftJoin |
|---|---|---|---|
| 0 | {key:A,value:X} | ||
| 5 | {key:A,value:Y} | {left:X,right:Y} |
Notes when using TopologyTestDriver
You should keep in mind that the joins make progress only by producing records when writing tests using TopologyTestDriver. (Also there are several points you should make sure to write correct test)
Let's say we have below KafkaStreams test:
- There are topics s1, s2
- Test left-joining s1 with s2 in 100 millisec window, and output the joined String in the form of
"JOINED({left value}/{right value})"
Serde<String> serde = Serdes.String();
Serializer<String> ser = serde.serializer();

Properties props = new Properties();

// By default, KafkaStreams RocksDB as the window store.
// Set unique application.id is important to avoid reusing window data of previous tests, which could cause unpredictable test results.
// (As long as closing TopologyTestDriver properly, RocksDB data are cleaned-up every time though)
props.setProperty(StreamsConfig.APPLICATION_ID_CONFIG, UUID.randomUUID().toString());
props.setProperty(StreamsConfig.BOOTSTRAP_SERVERS_CONFIG, "test:9092");
props.setProperty(StreamsConfig.DEFAULT_KEY_SERDE_CLASS_CONFIG, serde.getClass().getName());
props.setProperty(StreamsConfig.DEFAULT_VALUE_SERDE_CLASS_CONFIG, serde.getClass().getName());
// When we do outer join, non-joined records (i.e. no corresponding key appeared in other stream) only emitted
// after this interval elapsed.
// That means we have to advance mockTime of TestTopologyDriver accordingly, which is bit bothersome.
// For the ease of testing, we just set the interval to 0 to emit non-joined result immediately as soon as the window expires.
props.setProperty(InternalConfig.EMIT_INTERVAL_MS_KSTREAMS_OUTER_JOIN_SPURIOUS_RESULTS_FIX, "0");

StreamsBuilder builder = new StreamsBuilder();
KStream<String, String> s1 = builder.stream("s1", Consumed.with(serde, serde));
s1.foreach((k,v) -> System.out.printf("produced s1. key: %s\n", k));
KStream<String, String> s2 = builder.stream("s2", Consumed.with(serde, serde));
s2.foreach((k,v) -> System.out.printf("produced s2. key: %s\n", k));

s1.leftJoin(s2, (v1, v2) -> String.format("JOINED(%s/%s)", v1, v2),
            JoinWindows.ofTimeDifferenceWithNoGrace(Duration.ofMillis(100L)))
  .foreach((k, v) -> System.out.printf("Joined. key: %s, value: %s\n", k, v));

// As described above, we should use TopologyTestDriver in try-with-resource to ensure the resources are cleaned up correctly
try (TopologyTestDriver driver = new TopologyTestDriver(builder.build(), props, Instant.ofEpochMilli(0L))) {
    TestInputTopic<String, String> s1Topic =
            driver.createInputTopic("s1", ser, ser, Instant.ofEpochMilli(0L), Duration.ZERO);
    TestInputTopic<String, String> s2Topic =
            driver.createInputTopic("s2", ser, ser, Instant.ofEpochMilli(0L), Duration.ZERO);

    s1Topic.pipeInput("A", "1", 0L);
    s1Topic.pipeInput("B", "2", 50L);
    s2Topic.pipeInput("C", "3", 101L);
    s1Topic.pipeInput("D", "4", 151L);
}
This test yields below output:
produced s1. key: A
produced s1. key: B
produced s2. key: C
Joined. key: A, value: JOINED(1/null)
produced s1. key: D
Joined. key: B, value: JOINED(2/null)
The result can be interpreted like:
| t | event | description |
|---|---|---|
| 0 | Produce A:1 to topic s1 | |
| 50 | Produce B:2 to topic s1 | |
| 101 | Produce C:3 to topic s2 | A:1 window expires because 100 millis elapsed. JOINED result for A:1 is emitted |
| 151 | Produce D:4 to topic s1 | B:2 window expires because 100 millis elapsed. JOINED result for B:2 is emitted |
D:4 is still in pending because no more records are produced after that, so joined result is not emitted for D:4
Further reading: KafkaStreams test code
Access raw clipboard PNG image data in Electron (macOS)
Electron provides the API to get clipboard data via clipboard.readImage.
However, I found it doesn't preserve original image info so some information may drop.
Notably, pHYs metadata in PNG.
The problem arises when we take a screenshot in macOS with storing it in clipboard, then trying to get the data in Electron.
The width/height is doubled to the original screenshot.
That's due to "scale-factor" mechanism in macOS.
macOS's native apps like Preview.app uses pHYs information to get the scale-factor, so they can show the image in original size. (See this code for the details)
There's a SO post that discusses same phenomenon.
Workaround
The workaround is to use readBuffer instead of readImage to get the unconverted raw image.
readBuffer takes an argument which specifies the custom format name, and it's passed through to [NSPasteboard dataForType:] under the hood.
NSPasteboardType for the raw PNG data in clipboard is defined as NSPasteboardTypePNG, that is "public.png".
Hence, you can access raw PNG data from Electron by readBuffer("public.png").
Environment
- Electron: 22.0.3
- macOS: 12.6 (Monterey)
Incremental Fetch Requests in Kafka
Incremental Fetch Requests introduced in Kafka 1.1.0 is a mechanism to reduce Fetch overhead (especially when a client is interested in many partitions e.g. ReplicaFetchers)
Before KIP-227, all topic partitions had to be enumerated in every Fetch requests and responses.
Let's say a client is interested in tp-X-0, tp-Y-1, tp-Z-1, and tp-Y, tp-Z's message rate is much fewer than tp-X.
Most of time, Fetch requests are completed by tp-X's message production (by fetch.min.bytes), and no data will be returned for tp-Y, tp-Z, so essentially they are not necessary to be included in Fetch responses.
The idea of Incremental Fetch Requests is to include only necessary topic partitions in each requests/responses.
In a nutshell, it works like:
- When a client start fetching, it establishes FetchSession with the broker to cache partition information that the client is interested in
- The client will omit including partition info in Fetch requests unless it wants to update the fetch offset (after fetching new data)
- Similarly, the broker will omit including partition info in Fetch responses unless there's a data to be returned (after some data is produced)
Let's see this by experiment.
Settings:
| component | port | description |
|---|---|---|
| broker-1 | 9091 | |
| broker-2 | 9092 | |
| broker-3 | 9093 | leader of test-topic-0 |
| zk | 2181 |
And test-topic has only one partition.
First, start console consumer
$ bin/kafka-console-consumer.sh --bootstrap-server localhost:9091 --topic test-topic
Check the consumer's port
$ lsof -p $(jps | grep ConsoleConsumer | cut -d' ' -f1) | grep 9093
java    66011 hokada  106u     IPv6             468231       0t0     TCP lima-default:42364->lima-default:9093 (ESTABLISHED)
Take tcpdump of console-consumer
$ sudo tcpdump src port 42364 or dst port 42364 -i any -w dump.pcap
tcpdump: data link type LINUX_SLL2
tcpdump: listening on any, link-type LINUX_SLL2 (Linux cooked v2), snapshot length 262144 bytes
After a while, in other terminal, produce a message
$ bin/kafka-console-producer.sh --broker-list localhost:9091 --topic test-topic
End tcpdump and open the dump in wireshark, with decoding as Kafka protocol
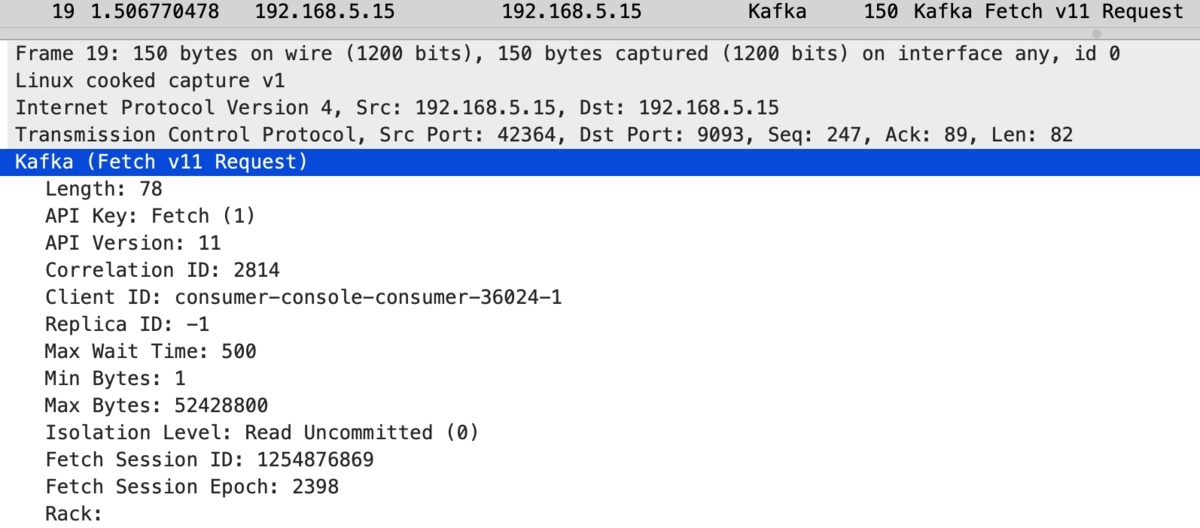
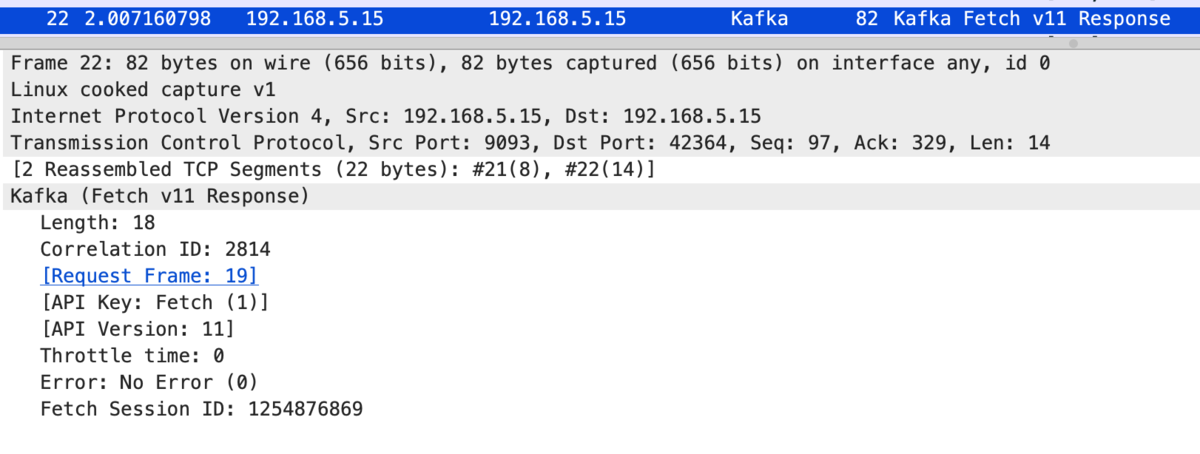
As we can see, partition info is not included in Fetch requests/responses,
And only after producing a message, Fetch response returns partition data:
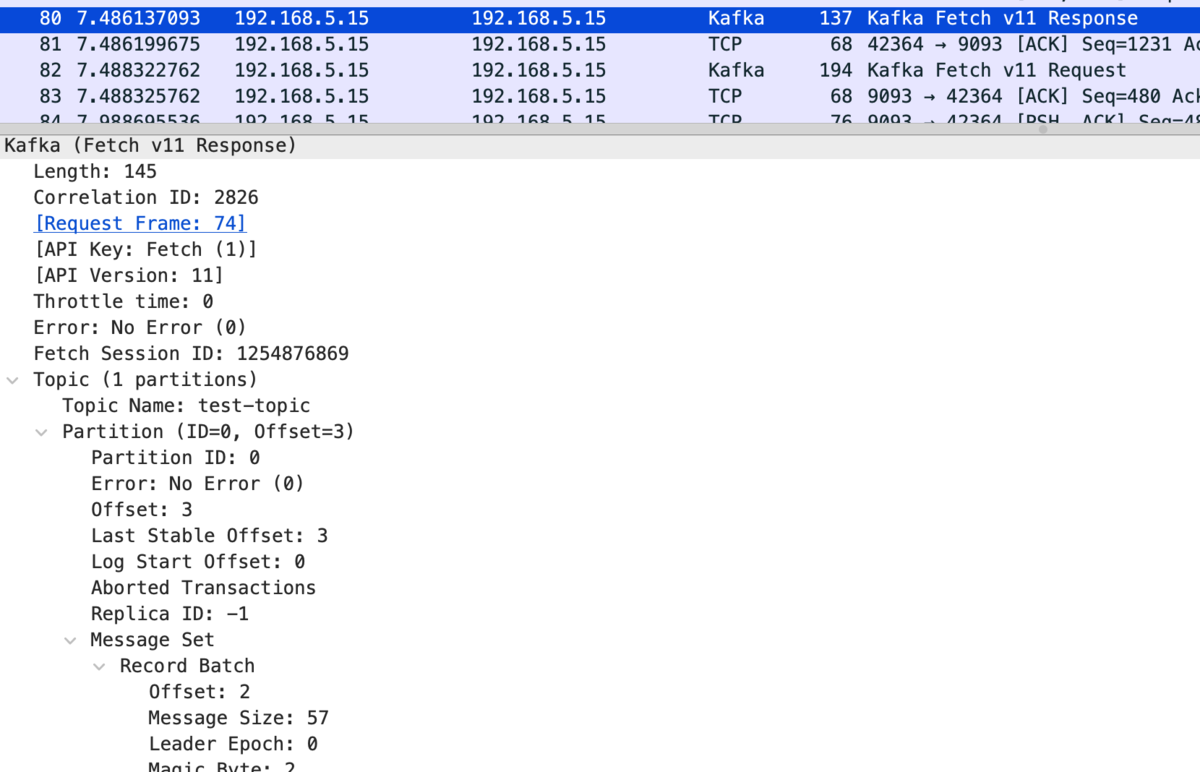
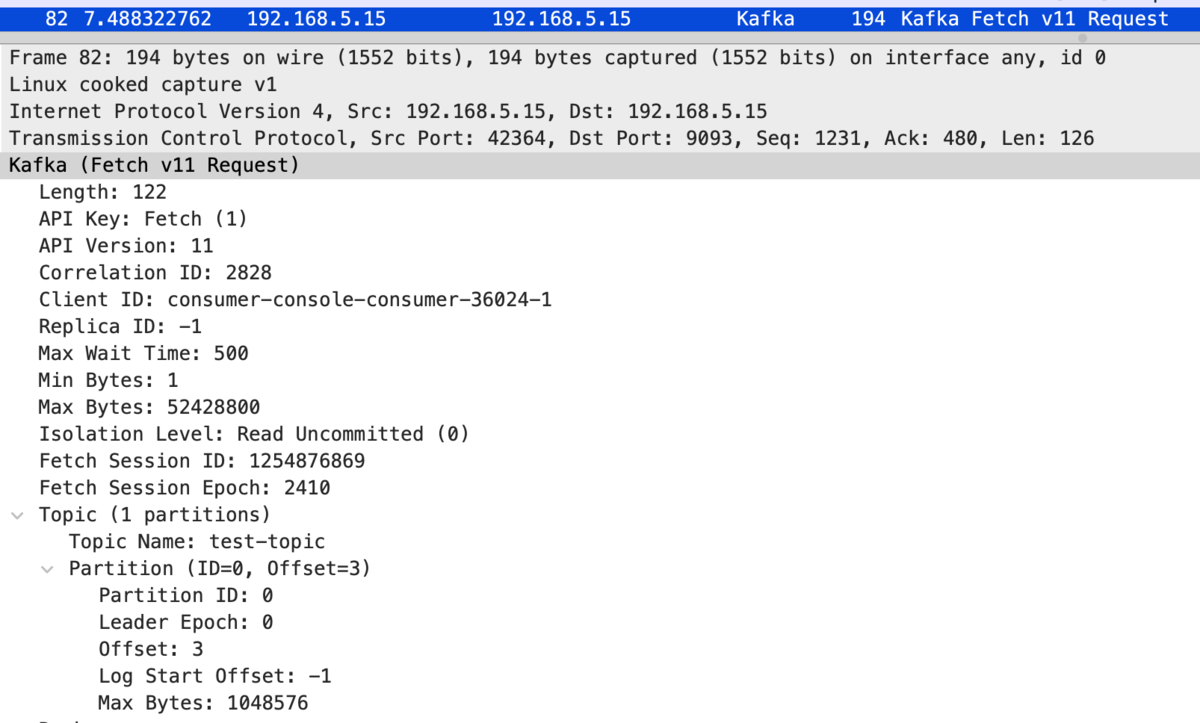
Fetch requests also include partition info to update the fetch offset: